jekyll github blog 커스텀하기 [2]
태그 모음 추가하기
- 목차 -
바로 앞 게시물에서 언급했던 태그 모음을 추가해보겠습니다. categories.html 에 이어서 작성했습니다.
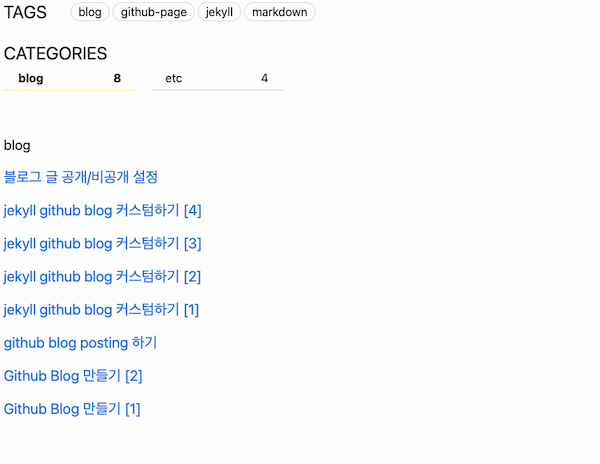
완성 미리 보기 ❗️
Tags 불러오기
먼저 site.tags 를 활용해서 tag들을 불러와 for문으로 작성을 하겠습니다.
# categories.html

---
layout: page
permalink: /categories/
title: Category
---

<div class="tag-wrap">
  {% for tag in site.tags %}
    {% capture tag_name %}{{ tag | first | slugize }}{% endcapture %}
    {% capture tag_size %}{{ tag | last | size }}{% endcapture %}
    <span  class="{{ tag_name }}">{{ tag_name }}</span>
  {% endfor %}
</div>
capture: 사용할 변수 선언slugsize: 소문자로 표현해주는 필터
기능 추가하기
태그나 카테고리를 누르면 페이지에 선택한 글 목록만 보여주게 만들 거예요. 앞 페이지에서 만들어 두었던 categorie.html 을 수정 해줍니다.
.title-wrap 에 전체 카테고리 리스트, 태그 리스트 들을 불러 주고 .post-wrap 에는 카테고리, 태그 별로 포스트 리스트를 불러왔습니다.
# categories.html

---
layout: category
permalink: /categories/
title: Category
---
<div class="title-wrap">
  <div class="flex">
    <h1>TAGS</h1>
    <div class="tag-wrap">
      {% for tag in site.tags %}
      {% capture tag_name %}{{ tag | first | slugize }}{% endcapture %}
      {% capture tag_size %}{{ tag | last | size }}{% endcapture %}
      <span  class="{{ tag_name }}" onclick="showList('tag', '{{ tag_name }}')">
        {{ tag_name }}
      </span>
      {% endfor %}
    </div>
  </div>
  <div style="margin-top: 20px;">
    <h1>CATEGORIES</h1>
    <div class="category-wrap">
      {% for category in site.categories %}
      {% capture category_name %}{{ category | first }}{% endcapture %}
      {% capture category_size %}{{ category | last | size }}{% endcapture %}
      <span
        class="{{ category_name }}"
        onclick="showList('category', '{{category_name}}')">
        <p class="title">{{ category_name }}</p>
        <p class="count">{{ category_size }}</p>
      </span>
      {% endfor %}
    </div>
  </div>
</div>
<div class="post-wrap">
  <div id="category">
    {% for category in site.categories %}
    {% capture category_name %}{{ category | first }}{% endcapture %}
      <article class="archive-item {{ category_name }}">
        <h1>{{ category_name }}</h1>
        {% for post in site.categories[category_name] %}
          <h4><a href="{{ site.baseurl }}{{ post.url }}">{{post.title}}</a></h4>
        {% endfor %}
      </article>
    {% endfor %}
  </div>
  <div id="tag">
    {% for tag in site.tags %}
      {% capture tag_name %}{{ tag | first | slugize }}{% endcapture %}
        <article class="archive-item {{ tag_name }}">
          <h1>{{ tag_name }}</h1>
          {% for post in site.tags[tag_name] %}
          <h4><a href="{{ site.baseurl }}{{ post.url }}"> {{ post.title }} </a></h4>
          {% endfor %}
        </article>
    {% endfor %}
  </div>
</div>
html 안에 script 태그를 열어서 .title-wrap에서 카테고리나 태그를 클릭하면 해당 포스트 리스트를 보여주기 위해서 showList 라는 함수를 만들었습니다.
const showList = (type, name) => {
  document.querySelectorAll('.on').forEach(item => item.classList.remove('on'))
  document.getElementById(`${type}`).querySelector(`.${name}`).classList.add('on')
  document.querySelector(`.${type}-wrap .${name}`).classList.add('on')
}
style✨ 추가하기
마지막으로 style 을 html 하단에 작성해주었습니다.
.post-wrap{
  margin-top: 60px;
  .archive-item{
    display: none;
    &.on{ display: block; }
  }
}
.title-wrap{
  h1{ margin: 0; }
  .flex{
    display: flex;
    gap: 30px;
    align-items: center;
  }
  .tag-wrap{
    display: flex;
    flex-wrap: wrap;
    margin: 0;
    span {
      cursor: pointer;
      list-style: none;
      border: 1px solid #ddd;
      border-radius: 50px;
      padding: 0px 10px;
      margin: 2px;
      &.on{
        background: #6fd5fe;
      }
    }
  }
  .category-wrap{
    display: flex;
    flex-wrap: wrap;
    gap: 20px;
    margin: 0;
    span {
      width: 140px;
      padding: 4px 20px;
      display: flex;
      align-items: center;
      justify-content: space-between;
      cursor: pointer;
      border-bottom: 1px solid #ddd;
      p{
        margin-bottom: 0;
      }
      &.on{
        font-weight: bold;
        border-bottom: 1px solid #6fd5fe;
      }
    }
  }
}